Django+haystack+whoosh+jieba全文检索实现

全文检索主要用在大数据量时多字段模糊检索上能较大的提高检索效率。django实现全文检索功能主要靠haystack框架,而用的最多的全文检索引擎就是whooshjieba主要用于中文分词,whoosh自带的分词是英文的。要实现以上组合的全文检索,首先要安装这些模块:

pip install django-haystackpip install whooshpip install jieba


配置haystack框架和whoosh引擎

安装好以上模块后,接下来要到项目的settings.py中添加haystack应用,配置whoosh搜索引擎。

#settings.pyINSTALLED_APPS = [    'django.contrib.admin',    'django.contrib.auth',    'django.contrib.contenttypes',    'django.contrib.sessions',    'django.contrib.messages',    'django.contrib.staticfiles',    'haystack',#全文检索框架    'book',    'user',    'recommend',    'library',    'comment',]
HAYSTACK_CONNECTIONS = {    'default': {        #使用whoosh引擎        'ENGINE': 'haystack.backends.whoosh_cn_backend.WhooshEngine',        #索引文件路径        'PATH': os.path.join(BASE_DIR, 'whoosh_index'),    }}

接下来到项目的urls.py中添加全文检索的路由。

#项目的urls.pyurlpatterns = [    path('admin/', admin.site.urls),    path('',include('book.urls')),    path('book/', include('book.urls')),    path('user/', include('user.urls')),    path('recommend/', include('recommend.urls')),    path('library/', include('library.urls')),    path('comment/', include('comment.urls')),    path('search/', include('haystack.urls')),#全文检索路由]

然后在要做全文检索的app book下创建search_indexes.py文件,该文件是固定命名,内容如下:

#导入索引from haystack import indexes#导入模型from .models import Book_info#Book_infoIndex是固定格式命名,Book_info是你models.py中的类名class Book_infoIndex(indexes.SearchIndex, indexes.Indexable):    text = indexes.CharField(document=True, use_template=True)
    def get_model(self):        return Book_info
    def index_queryset(self, using=None):        return self.get_model().objects.all()

然后到项目下的templates文件夹中依次创建search/indexes/book/目录。book是你需要使用全文检索的app名,book前面的目录名是固定写法,不能更改。


接着在book目录下以”模型名_text.txt“格式创建搜索引擎的索引文件,如book_info_text.txt“,book_infobook app下的models.py中的一个模型类Book_info的小写。创建好txt文件后,在文件中输入要索引的字段。

{{ object.book_name }}{{ object.book_author }}{{ object.book_press }}

上面的内容我设置了Book_info数据库中的book_namebook_authorbook_press三个字段的全文索引。

中文分词设置

接下来设置中文分词,在系统根目录中查找haystack(windows系统查找对象是我的电脑,linux系统使用find / -name haystack),找到C:UserscgAppDataLocalProgramsPythonPython37-32Libsite-packageshaystackbackends python安装包下的这个文件夹,在该文件夹下创建ChineseAnalyzer.py,内容如下:

import jiebafrom whoosh.analysis import Tokenizer, Token
class ChineseTokenizer(Tokenizer):    def __call__(self, value, positions=False, chars=False,                 keeporiginal=False, removestops=True,                 start_pos=0, start_char=0, mode='', **kwargs):        t = Token(positions, chars, removestops=removestops, mode=mode,                  **kwargs)        seglist = jieba.cut(value, cut_all=True)        for w in seglist:            t.original = t.text = w            t.boost = 1.0            if positions:                t.pos = start_pos + value.find(w)            if chars:                t.startchar = start_char + value.find(w)                t.endchar = start_char + value.find(w) + len(w)            yield t
def ChineseAnalyzer():    return ChineseTokenizer()

复制whoosh_backend.py,将名称改为whoosh_cn_backend.py,打开该文件,引入中文分析类:

from .ChineseAnalyzer import ChineseAnalyzer

查找文件中analyzer=StemmingAnalyzer(),将其改为analyzer=ChineseAnalyzer()

完成以上的配置就可以建立索引文件了,在项目终端下输入命令重建索引:

python manage.py rebuild_index

创建好索引文件后通过python manage.py update_index来更新索引文件。

全文索引的使用

更改原来的检索模板文件:

<form action="/search/" method="GET">       <div class="input-group mb-3">              <input type="text" name="q" class="form-control" autocomplete="off" required placeholder="可检索字段-书名/作者/出版社">              <div class="input-group-append">                    <button class="btn btn-info" type="submit">搜索</button>                </div>       </div></form>

上面的action参数对应上文在项目urls.py中设置的路由,代表表单提交到全文检索路由,input输入中的name=q参数是haystack的固定写法,q代表查询的关键词。


用户提交检索后,系统将检索词提交给haystack,经过haystack查询后,默认结果返回到项目根目录下templates/search/search.html文件,结果中主要包含以下关键参数:

  • query:查询的关键词。
  • page:当前页的page对象,通过该对象获取查询的数据。
  • paginator:分页对象。

模板中主要代码如下:

<div class="clearfix">    <div class="alert alert-info">        检索到关于:&nbsp;<b>“{{ query }}”</b>&nbsp;的图书,当前第&nbsp;<b>{{ page.number }} </b>&nbsp;页    </div>    {# 遍历检索图书结果 #}    {% for item in page %}    <a href="{% url 'book_detail' %}?ids={{ item.object.book_id }}" style="color:black">        <div class="responsive">            <div class="img">                              <img src="{{ item.object.book_pic }}" alt="" width="300" height="200">                         <div class="desc">{{ item.object.book_name }}</div>                <div class="desc"><span>{{ item.object.book_press }}</span></div>            </div>        </div>    </a>    {% endfor %}</div>
{# 分页 #}  <div class="center">    <ul class="pagination">      {% if page.has_previous %}      <li class="page-item"><a class="page-link" href="?q={{query}}&amp;page={{ page.previous_page_number }}">上一页</a></li>      {% endif %}      {% if page.has_next %}      <li class="page-item"><a class="page-link" href="?q={{query}}&amp;page={{ page.next_page_number }}">下一页</a></li>      {% endif %}    </ul>  </div>

需要注意的是:通过page对象遍历获取的对象属性,需要在中间增加object,否则获取不到对象的属性。检索结果如下:

Django+haystack+whoosh+jieba全文检索实现

作者:libdream
链接:
https://www.jianshu.com/p/31646c304cb4
来源:
简书

Django 3.0+Redis 3.4+Celery 4.4 应用开发(附源码)


作者:大江狗

来源:Python Web与Django开发

大家好,我是猫哥。今天分享一篇文章,作者利用Django 3.0 +Redis 3.4 +Celery 4.4开发了个小应用。应用不复杂,但知识点很多,非常适合新手练手。项目需求如下:

  • 创建两个页面,一个用于创建页面,一个用于动态展示页面详情,并提供静态HMTL文件链接

  • 一个页面创建完成后,使用Celery异步执行生成静态HTML文件的任务

  • 使用redis作为Celery的Broker

  • 使用flower监控Celery异步任务执行情况

Django 3.0+Redis 3.4+Celery 4.4 应用开发(附源码)

项目完成后演示见下面动画。本项目的GitHub源码地址在最后,请耐心阅读。
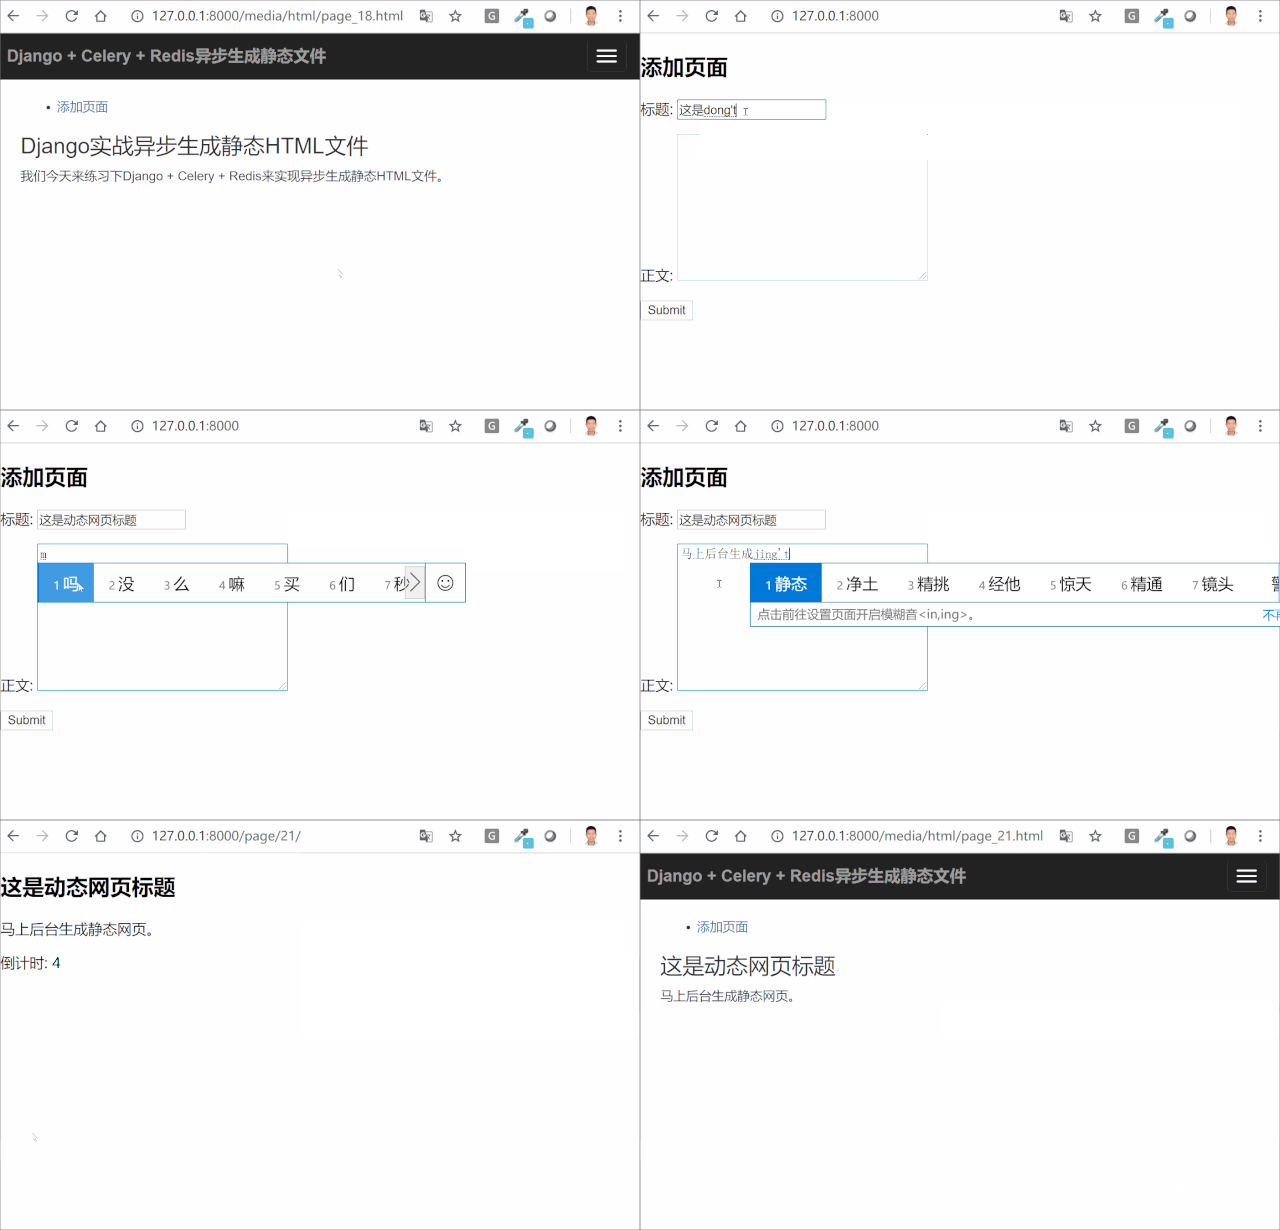
Django 3.0+Redis 3.4+Celery 4.4 应用开发(附源码)


第零步:pip设置国内源

国内用户使用pip安装python包特别慢,这主要是应为国内连接国外网络不稳定。为加速python包的安装,首先将pip安装源设置为国内的镜像,比如阿里云提供的镜像。

linux系统修改 ~/.pip/pip.conf (没有就创建一个), 内容如下:

[global]index-url = https://mirrors.aliyun.com/pypi/simple/

windows系统直接在user目录中创建一个pip目录,如:C:Usersxxpip,新建文件pip.ini,内容如下:

[global]index-url = http://mirrors.aliyun.com/pypi/simple/

第一步:安装Django并创建项目myproject

使用pip命令安装Django.

 pip install django==3.0.4 # 安装Django,所用版本为3.0.4

使用django-admin startproject myproject创立一个名为myproject的项目

 django-admin startproject myproject

整个项目完整目录机构如下所示, 项目名为myproject, staticpage为app名。
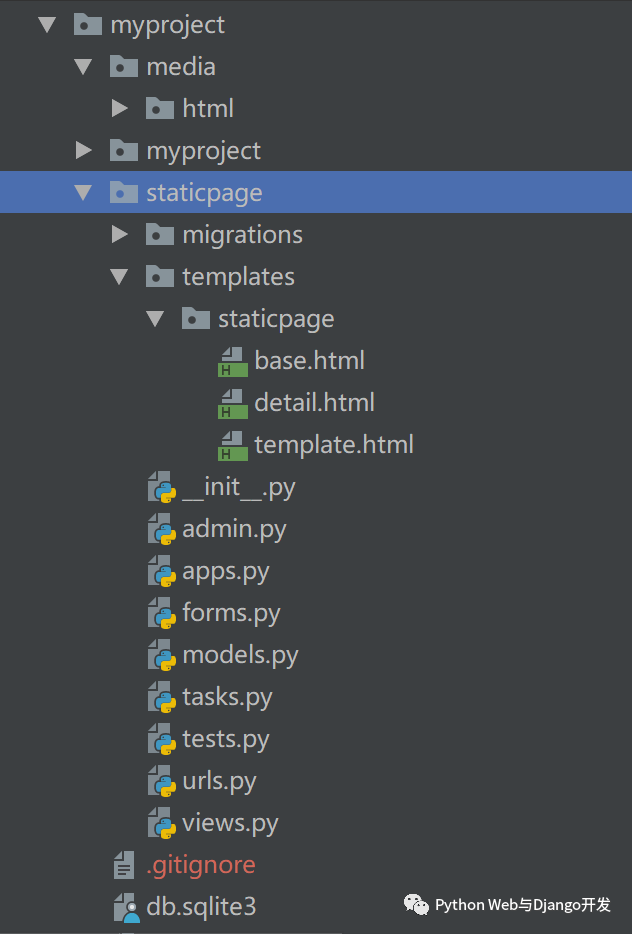
Django 3.0+Redis 3.4+Celery 4.4 应用开发(附源码)

第二步:安装redis和项目依赖的第三方包

项目中我们需要使用redis做Celery的中间人(Broker), 所以需要先安装redis数据库。redis网上教程很多,这里就简要带过了。

  • Windows下载地址:https://github.com/MSOpenTech/redis/releases

  • Linux下安装(Ubuntu系统):$ sudo apt-get install redis-server

本项目还需要安装如下依赖包,你可以使用pip命令逐一安装。

 pip install redis==3.4.1
 pip install celery==4.4.2
 pip install eventlet # celery 4.0+版本以后不支持在windows运行,还需额外安装eventlet库

你还可以myproject目录下新建requirements.txt加入所依赖的python包及版本,然后使用pip install -r requirements.txt命令安装所有依赖。本教程所使用的django, redis和celery均为最新版本。

 django==3.0.5
 redis==3.4.1
 celery==4.4.2  
 eventlet # for windows only

第三步:Celery基本配置

  1. 修改settings.py新增celery有关的配置。celery默认也是有自己的配置文件的,名为celeryconfig.py, 但由于管理多个配置文件很麻烦,我们把celery的配置参数也写在django的配置文件里。

 # 配置celery时区,默认时UTC。
 if USE_TZ:
     timezone = TIME_ZONE
 
 # celery配置redis作为broker。redis有16个数据库,编号0~15,这里使用第1个。
 broker_url = 'redis://127.0.0.1:6379/0'
 
 # 设置存储结果的后台
 result_backend = 'redis://127.0.0.1:6379/0'
 
 # 可接受的内容格式
 accept_content = ["json"]
 # 任务序列化数据格式
 task_serializer = "json"
 # 结果序列化数据格式
 result_serializer = "json"
 
 # 可选参数:给某个任务限流
 # task_annotations = {'tasks.my_task': {'rate_limit': '10/s'}}
 
 # 可选参数:给任务设置超时时间。超时立即中止worker
 # task_time_limit = 10 * 60
 
 # 可选参数:给任务设置软超时时间,超时抛出Exception
 # task_soft_time_limit = 10 * 60
 
 # 可选参数:如果使用django_celery_beat进行定时任务
 # beat_scheduler = "django_celery_beat.schedulers:DatabaseScheduler"
 
 # 更多选项见
 # https://docs.celeryproject.org/en/stable/userguide/configuration.html
  1. settings.py同级目录下新建celery.py,添加如下内容:

 # coding:utf-8
 from __future__ import absolute_import, unicode_literals
 import os
 from celery import Celery
 
 # 指定Django默认配置文件模块
 os.environ.setdefault('DJANGO_SETTINGS_MODULE', 'myproject.settings')
 
 # 为我们的项目myproject创建一个Celery实例。这里不指定broker容易出现错误。
 app = Celery('myproject', broker='redis://127.0.0.1:6379/0')
 
 # 这里指定从django的settings.py里读取celery配置
 app.config_from_object('django.conf:settings')
 
 # 自动从所有已注册的django app中加载任务
 app.autodiscover_tasks()
 
 # 用于测试的异步任务
 @app.task(bind=True)
 def debug_task(self):
     print('Request: {0!r}'.format(self.request))
 
 
  1. 打开settings.py同级目录下的__init__.py,添加如下内容, 确保项目启动时即加载Celery实例

 # coding:utf-8
 from __future__ import absolute_import, unicode_literals
 
 # 引入celery实例对象
 from .celery import app as celery_app
 __all__ = ('celery_app',)

网上很多django redis + celery的教程比较老了, 坑很多。比如新版原生的Celery已经支持Django了,不需要再借助什么django-celery和celery-with-redis这种第三方库了, 配置参数名也由大写变成了小写,无需再加CELERY前缀。另外当你通过app = Celery('myproject')创建Celery实例时如果不指定Broker,很容易出现[ERROR/MainProcess] consumer: Cannot connect to amqp://guest:**@127.0.0.1:5672//: [Errno 111] Connection refused这个错误。

第四步:启动redis,测试celery是否配置成功

在Django中编写和执行自己的异步任务前,一定要先测试redis和celery是否安装好并配置成功。

首先你要启动redis服务。windows进入redis所在目录,使用redis-server.exe启动redis。Linux下使用./redis-server redis.conf启动,也可修改redis.conf将daemonize设置为yes, 确保守护进程开启。

启动redis服务后,你要先运行python manage.py runserver命令启动Django服务器(无需创建任何app),然后再打开一个终端terminal窗口输入celery命令,启动worker。

 # Linux下测试
 Celery -A myproject worker -l info
 
 # Windows下测试
 Celery -A myproject worker -l info -P eventlet

如果你能看到[tasks]下所列异步任务清单如debug_task,以及最后一句celery@xxxx ready, 说明你的redis和celery都配置好了,可以开始正式工作了。

 
 -------------- celery@DESKTOP-H3IHAKQ v4.4.2 (cliffs)
 --- ***** -----
 -- ******* ---- Windows-10-10.0.18362-SP0 2020-04-24 22:02:38
 
 - *** --- * ---
 - ** ---------- [config]
 - ** ---------- .> app:         myproject:0x456d1f0
 - ** ---------- .> transport:   redis://127.0.0.1:6379/0
 - ** ---------- .> results:     redis://localhost:6379/0
 - *** --- * --- .> concurrency: 4 (eventlet)
   -- ******* ---- .> task events: OFF (enable -E to monitor tasks in this worker)
   --- ***** -----
    -------------- [queues]
                .> celery           exchange=celery(direct) key=celery
 
 
 [tasks]
  . myproject.celery.debug_task
 
 [2020-04-24 22:02:38,484: INFO/MainProcess] Connected to redis://127.0.0.1:6379/0
 [2020-04-24 22:02:38,500: INFO/MainProcess] mingle: searching for neighbors
 [2020-04-24 22:02:39,544: INFO/MainProcess] mingle: all alone
 [2020-04-24 22:02:39,572: INFO/MainProcess] pidbox: Connected to redis://127.0.0.1:6379/0.
 [2020-04-24 22:02:39,578: WARNING/MainProcess] c:usersmissenkapycharmprojectsdjango-static-html-generatorvenvlibsite-packagesceleryfixupsdjango.py:203: UserWarning: Using sett
 ings.DEBUG leads to a memory
            leak, never use this setting in production environments!
  leak, never use this setting in production environments!''')
 [2020-04-24 22:02:39,579: INFO/MainProcess] celery@DESKTOP-H3IHAKQ ready.

第五步:Django中创建新应用staticpage

cd进入myproject文件夹,使用python manage.py startapp staticpage创建一个名为staticpage的app。我们将创建一个简单的Page模型,并编写两个视图(对应两个URLs),一个用于添加页面,一个用于展示页面详情。staticpage目录下我们将要编辑或创建5个.py文件,分别是models.py, urls.py, views.py, forms.py和tasks.py,其中前4个都是标准的Django项目文件,内容如下所示。最后一个tasks.py用于存放我们自己编写的异步任务,稍后我会详细讲解。

 # staticpage/models.py
 from django.db import models
 import os
 from django.conf import settings
 
 class Page(models.Model):
     title = models.CharField(max_length=100, verbose_name="标题")
     body = models.TextField(verbose_name="正文")
 
     def __int__(self):
         return self.title
 
     # 静态文件URL地址,比如/media/html/page_8.html
     def get_static_page_url(self):
         return os.path.join(settings.MEDIA_URL, 'html', 'page_{}.html'.format(self.id))
 
 # staticpage/urls.py
 from django.urls import path, re_path
 from . import views
 
 
 urlpatterns = [
 
     # Create a page 创建页面
     path('', views.page_create, name='page_create'),
 
     # Page detail 展示页面详情。动态URL地址为/page/8/
     re_path(r'^page/(?P<pk>d+)/

page_create视图函数中你可以看到我们在一个page实例存到数据库后调用了generate_static_page函数在后台完成静态HTML页面的生成。如果我们不使用异步的化,我们要等静态HTML文件完全生成后才能跳转到页面详情页面, 这有可能要等好几秒。generate_static_page就是我们自定义的异步任务,代码如下所示。Celery可以自动发现每个Django app下的异步任务,不用担心。

 # staticpage/tasks.py
 
 import os, time
 from django.template.loader import render_to_string
 from django.conf import settings
 from celery import shared_task
 
 @shared_task
 def generate_static_page(page_id, page_title, page_body):
     # 模拟耗时任务,比如写入文件或发送邮件等操作。
     time.sleep(5)
 
     # 获取传递的参数
     page = {'title': page_title, 'body': page_body}
     context = {'page': page, }
 
     # 渲染模板,生成字符串
     content = render_to_string('staticpage/template.html', context)
 
     # 定义生成静态文件所属目录,位于media文件夹下名为html的子文件夹里。如目录不存在,则创建。
     directory = os.path.join(settings.MEDIA_ROOT, "html")
     if not os.path.exists(directory):
         os.makedirs(directory)
 
     # 拼接目标写入文件地址
     static_html_path = os.path.join(directory, 'page_{}.html'.format(page_id))
 
     # 将渲染过的字符串写入目标文件
     with open(static_html_path, 'w', encoding="utf-8") as f:
             f.write(content)
 

本例中我们生成的静态HTML文件位于media文件夹下的html子文件夹里,这样做有两个好处:

  • 与Django的静态文件存储规范保持一致:用户产生的静态文件都放在media文件下,网站本身所依赖的静态文件都放于static文件夹下。

  • 把所有产生的静态文件放在一个目录里与动态文件相分开,利于后续通过nginx部署。

本项目中还用到了3个模板,分别是base.html, detail.html和template.html。base.html和detail.html是没有任何样式的, 仅用于动态显示内容,template.html是用来生成静态文件的模板,是带样式的,这样你就可以很快区分动态页面和静态页面。由于我们后台生成静态文件至少需要5秒钟,我们在detail.html用了点javascript实现等5秒倒计时完成后显示生成的静态HTML文件地址。

3个模板均位于staticpage/templates/staticpage/文件夹下,代码如下所示:

 # base.html
 <!DOCTYPE html>
 <html lang="en">
 <head>
     <meta charset="UTF-8">
     <title>添加页面</title>
 </head>
 <body>
      <h2>添加页面</h2>
      <form name="myform"  method="POST" action=".">
          {% csrf_token %}
        {{ form.as_p }}
          <button type="submit">Submit</button>
      </form>
 </body>
 </html>
 
 # detail.html
 <!DOCTYPE html>
 <html lang="en">
 <head>
     <meta charset="UTF-8">
     <title>{{ page.title }}</title>
 </head>
 <body>
      <h2>{{ page.title }}</h2>
      <p>{{ page.body }}</p>
 
      <p>倒计时: <span id="Time">5</span></p>
      <p id="static_url" style="display:none;"> <small><a href='{{ page.get_static_page_url }}'>跳转到静态文件</a></small></p>
 
 
 <script>
  //使用匿名函数方法
  function countDown(){
  var time = document.getElementById("Time");
  var p = document.getElementById("static_url");
  //获取到id为time标签中的内容,现进行判断
  if(time.innerHTML == 0){
  //等于0时, 显示静态HTML文件URL
  p.style.display = "block";
  }else{
  time.innerHTML = time.innerHTML-1;
  }
  }
  //1000毫秒调用一次
  window.setInterval("countDown()",1000);
  </script>
 
 </body>
 </html>
 
 # template.html 生成静态文件模板
 {% load static %}
 <html lang="en">
 <head>
 <title>{% block title %}Django文档管理{% endblock %} </title>
 <meta charset="utf-8">
 <meta name="viewport" content="width=device-width, initial-scale=1">
 <link rel="stylesheet" href="https://maxcdn.bootstrapcdn.com/bootstrap/3.3.5/css/bootstrap.min.css">
 </head>
 
 <body>
 <nav class="navbar navbar-inverse navbar-static-top bs-docs-nav">
 
   <div class="container">
     <div class="navbar-header">
         <button type="button" class="navbar-toggle" >
           <span class="icon-bar"></span>
           <span class="icon-bar"></span>
           <span class="icon-bar"></span>                        
       </button>
         <a class="navbar-brand" href="#"><strong>Django + Celery + Redis异步生成静态文件</strong></a>
      </div>
 
       <div class="collapse navbar-collapse" id="myNavbar">
        <ul class="nav navbar-nav navbar-right">
  {% if request.user.is_authenticated %}
 
           <li class="dropdown">
               <a class="dropdown-toggle btn-green" href="#"><span class="glyphicon glyphicon-user"></span> {{ request.user.username }} <span class="caret"></span></a>
             <ul class="dropdown-menu">
               <li><a  href="#">My Account</a></li>
               <li><a  href="#">Logout</a></li>
             </ul>
           </li>  
          {% else %}  
             <li class="dropdown"><a class="dropdown-toggle btn-green" href="#"><span class="glyphicon glyphicon-user"></span> Sign Up</a></li>
 <li class="dropdown"><a class="dropdown-toggle" href="#" ><span class="glyphicon glyphicon-log-in"></span> Login</a></li>
  {% endif %}
        </ul>
 
     </div>
 
   </div>
 </nav>    
 
  <!-- Page content of course! -->
 <main id="section1" class="container-fluid">
 
 <div class="container">
     <div class="row">
      <div class="col-sm-3 col-hide">
          <ul>
              <li> <a href="{% url 'page_create' %}">添加页面</a> </li>
          </ul>
      </div>
 
      <div class="col-sm-9">
           <h3>{{ page.title }}</h3>
          {{ page.body }}
      </div>
 </div>
 
 </div>
 </main>

 <script src="https://code.jquery.com/jquery-3.3.1.min.js" integrity="sha256-FgpCb/KJQlLNfOu91ta32o/NMZxltwRo8QtmkMRdAu8=" crossorigin="anonymous"></script>
 <script src="https://maxcdn.bootstrapcdn.com/bootstrap/3.3.7/js/bootstrap.min.js"></script>
 
 </body>
 </html>

第六步:在Django中注册app并添加app的URLConf

 # 修改myproject/settings.py,添加如下内容
 INSTALLED_APPS = [
     'django.contrib.admin',
     'django.contrib.auth',
     'django.contrib.contenttypes',
     'django.contrib.sessions',
     'django.contrib.messages',
     'django.contrib.staticfiles',
     'staticpage',
 ]
 
 # 设置STATIC_URL和STATIC_ROOT
 STATIC_URL = '/static/'
 STATIC_ROOT = os.path.join(BASE_DIR, 'static')
 
 # 设置MEDIA_ROOT和MEDIA_URL
 MEDIA_ROOT = os.path.join(BASE_DIR, 'media')
 MEDIA_URL = '/media/'
 
 # 修改myproject/urls.py,添加如下内容
 from django.contrib import admin
 from django.urls import path, include
 
 from django.conf import settings
 from django.conf.urls.static import static
 
 
 urlpatterns = [
     path('admin/', admin.site.urls),
     path('', include("staticpage.urls")),
 ]
 
 # Django自带服务器默认不支持静态文件,需加入这两行。
 if settings.DEBUG:
     urlpatterns = urlpatterns + static(settings.MEDIA_URL, document_root=settings.MEDIA_ROOT)
     urlpatterns = urlpatterns + static(settings.STATIC_URL, document_root=settings.STATIC_ROOT)

第七步:启动Django服务器和并安装Celery异步任务监控工具

如果一切顺利,连续使用如下命令, 即可启动Django测试服务器。打开http://127.0.0.1:8000/即可看到我们项目开头的动画啦。注意:请确保redis和celery已同时开启。

 python manage.py makemigrations
 python manage.py migrate
 python manage.py runserver

如果你要监控异步任务的运行状态(比如是否成功,是否有返回结果), 还可以安装flower这个Celery监控工具。

 pip install flower

安装好后,你有如下两种方式启动服务器。启动服务器后,打开http://localhost:5555即可查看监控情况。

 # 从terminal终端启动, proj为项目名
 $ flower -A proj --port=5555  
 # 从celery启动
 $ celery flower -A proj --address=127.0.0.1 --port=5555


监控异步任务还是很重要的,强烈建议安装flower。比如下图中有些任务就失败了。

Django 3.0+Redis 3.4+Celery 4.4 应用开发(附源码)

源码地址

https://github.com/shiyunbo/django-static-page-generator-celery-redis

Django 3.0+Redis 3.4+Celery 4.4 应用开发(附源码)

送书活动

Django 3.0+Redis 3.4+Celery 4.4 应用开发(附源码)


本书共13章,主要内容涵盖Python语法及数据分析方法。章主要介绍数据分析的概念,使读者有一个大致的印象,并简单介绍本书频繁使用的Python的5个第三方库。第2章主要做一些准备工作,手把手带读者搭建Python环境,包括Python 3.7.6的安装和pip的安装。第3章介绍Python编程基础。第4章到第7章介绍使用Python进行简单数据分析的基础库,包括NumPy、Pandas和Matplotlib库,并介绍使用正则表达式处理数据的方法。第8章到3章属于进阶内容,但也是Python数据分析的基础,结合机器学习介绍一些常见的用于数据分析的机器学习算法及常用的数学模型。

赠书规则

赠书本数本次共包邮送书 

参与方式:在Python猫读者群抽奖,仅限群友参与。后台发“交流群”,获取入群方式。
开奖时间:2021年5月20日18:00


, views.page_detail, name=’page_detail’),
 
    ]
 
 # staticpage/views.py
 from django.shortcuts import render, redirect, get_object_or_404
 from django.urls import reverse
 from .forms import PageForm
 from .models import Page
 from .tasks import generate_static_page
 
 def page_create(request):
     if request.method == ‘POST’:
         form = PageForm(request.POST)
         if form.is_valid():
             page = form.save()
             generate_static_page.delay(page.id, page.title, page.body)
             return redirect(reverse(‘page_detail’, args=[str(page.pk)]))
     else:
         form = PageForm()
 
     return render(request, ‘staticpage/base.html’, {‘form’: form})
 
 
 def page_detail(request, pk):
     page = get_object_or_404(Page, id=pk)
     return render(request, ‘staticpage/detail.html’, {‘page’: page})
 
 # staticpage/forms.py
 from django import forms
 from .models import Page
 
 
 class PageForm(forms.ModelForm):
     class Meta:
         model = Page
         exclude = ()

page_create视图函数中你可以看到我们在一个page实例存到数据库后调用了generate_static_page函数在后台完成静态HTML页面的生成。如果我们不使用异步的化,我们要等静态HTML文件完全生成后才能跳转到页面详情页面, 这有可能要等好几秒。generate_static_page就是我们自定义的异步任务,代码如下所示。Celery可以自动发现每个Django app下的异步任务,不用担心。


本例中我们生成的静态HTML文件位于media文件夹下的html子文件夹里,这样做有两个好处:

  • 与Django的静态文件存储规范保持一致:用户产生的静态文件都放在media文件下,网站本身所依赖的静态文件都放于static文件夹下。

  • 把所有产生的静态文件放在一个目录里与动态文件相分开,利于后续通过nginx部署。

本项目中还用到了3个模板,分别是base.html, detail.html和template.html。base.html和detail.html是没有任何样式的, 仅用于动态显示内容,template.html是用来生成静态文件的模板,是带样式的,这样你就可以很快区分动态页面和静态页面。由于我们后台生成静态文件至少需要5秒钟,我们在detail.html用了点javascript实现等5秒倒计时完成后显示生成的静态HTML文件地址。

3个模板均位于staticpage/templates/staticpage/文件夹下,代码如下所示:


第六步:在Django中注册app并添加app的URLConf


第七步:启动Django服务器和并安装Celery异步任务监控工具

如果一切顺利,连续使用如下命令, 即可启动Django测试服务器。打开http://127.0.0.1:8000/即可看到我们项目开头的动画啦。注意:请确保redis和celery已同时开启。


如果你要监控异步任务的运行状态(比如是否成功,是否有返回结果), 还可以安装flower这个Celery监控工具。


安装好后,你有如下两种方式启动服务器。启动服务器后,打开http://localhost:5555即可查看监控情况。


监控异步任务还是很重要的,强烈建议安装flower。比如下图中有些任务就失败了。

Django 3.0+Redis 3.4+Celery 4.4 应用开发(附源码)

源码地址

https://github.com/shiyunbo/django-static-page-generator-celery-redis

转自:https://mp.weixin.qq.com/s/krlB0WdHpW1GSJhl2SinKw

Django 实现单点登录(SSO)

来自:CSDN,作者:亓官劼

链接:https://blog.csdn.net/qiguanjiezl/article/details/114435883

SSO简介

单点登录(Single Sign On)功能是一个非常常用的功能,尤其是我们在多个系统之间需要登录同步的时候,例如我们在登录QQ空间后,再去QQ的其他网站,都是默认登录的状态,这就是单点登录。
单点登录有很多种实现方法,这里介绍一个通过共享session的实现方法。实现共享session要做的就是要让多个不同应用共用同一个session,但是session默认的是每个应用一个独立的session和cookie的,所以这里要对session的存储进行配置。
除了默认的session存储,我也可以设置让session存储在文件、缓存或者数据库中。
如果我们让session存储在一个固定位置或者数据库中,然后我们设置各个应用cookie的domain为父域地址即可实现各个cookie的相同,从而时候各个cookie中存储的sessionID一致。

搭建测试环境

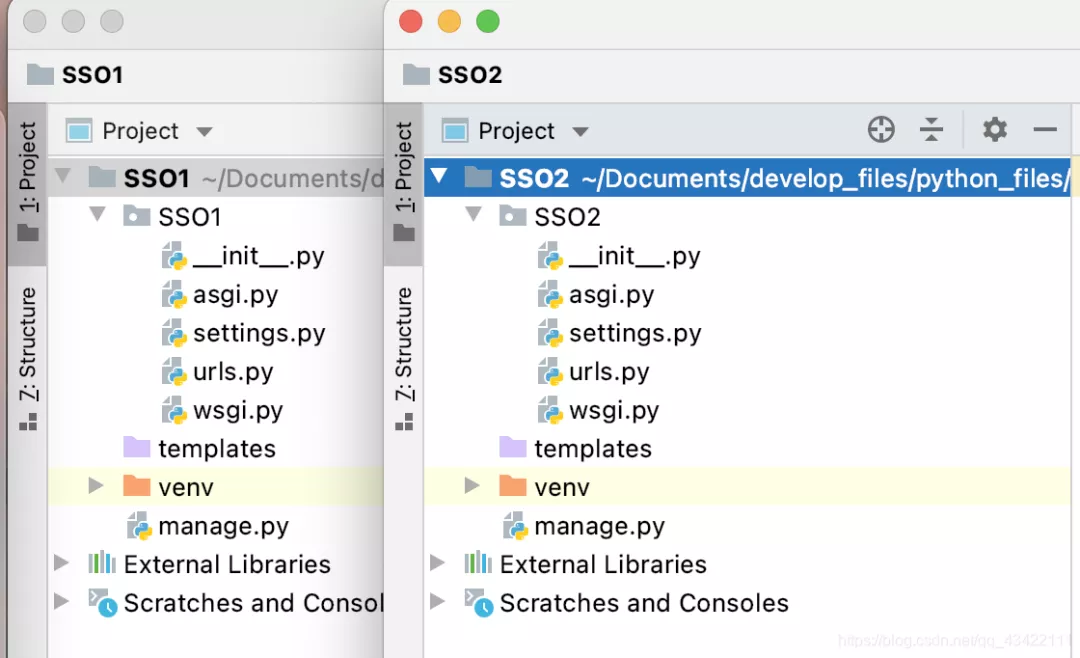
下面我们来创建两个空的Django项目来进行演示,SSO1和SSO2,这里采用pycharm直接创建两个Django项目,也可以在命令行中使用django-admin startproject sso来创建,其中sso是创建的项目名称。这里也可以使用两个完全相同的项目,在不同地址启动,但是为了演示效果,这里创建了2个。
Django 实现单点登录(SSO)
创建好两个项目后,我们要给项目写一个模拟的登录,注销的功能。
templates文件夹下创建文件login.html文件。这里直接使用之前写过的登录页面的代码,样式就不加了,在SSO1和SSO2中都加入login.html,具体代码为:
<!DOCTYPE html>
<html lang="en">
<head>
    <meta charset="UTF-8">
    <title>Title</title>
</head>
<body>
<div class="login_content">
    <div class="page-header" id="page_header">
      <h1>登录<small>Login</small></h1>
    </div>
    <div id="login_form">
        <form method="post">
          <div class="form-group">
            <label for="exampleInputEmail1">Email address</label>
            <input type="input" class="form-control" name="usr" id="exampleInputEmail1" placeholder="username">
          </div>
          <div class="form-group">
            <label for="exampleInputPassword1">密码</label>
            <input type="password" class="form-control" name="password" id="exampleInputPassword1" placeholder="密码">
          </div>
          <div id="login_butt">
              <button type="submit" class="btn btn-default">登录</button>
              <button type="button" class="btn btn-default" onclick="">注册</button>
          </div>
        </form>
    </div>
</div>
</body>
</html>
然后在SSO1文件夹创建一个view.py文件,用来存放视图函数。(这里仅为演示SSO,就不分模块了。)
创建文件后的文件目录为:(SSO2项目一样)
.
├── SSO1
│   ├── __init__.py
│   ├── asgi.py
│   ├── settings.py
│   ├── urls.py
│   ├── view.py
│   └── wsgi.py
├── manage.py
├── templates
│   └── login.html
└── venv
    ├── bin
    ├── include
    ├── lib
    └── pyvenv.cfg

插入一个小BUG

macbook运行环境,pycharm创建的Django应用有时候初始化有个bug,缺少os库,会报错:
Traceback (most recent call last):
  File "/Users/qiguan/Documents/develop_files/python_files/SSO1/manage.py", line 22in <module>
    main()
  File "/Users/qiguan/Documents/develop_files/python_files/SSO1/manage.py", line 18in main
    execute_from_command_line(sys.argv)
  File "/Users/qiguan/Documents/develop_files/python_files/SSO1/venv/lib/python3.7/site-packages/django/core/management/__init__.py", line 401in execute_from_command_line
    utility.execute()
  File "/Users/qiguan/Documents/develop_files/python_files/SSO1/venv/lib/python3.7/site-packages/django/core/management/__init__.py", line 345in execute
    settings.INSTALLED_APPS
  File "/Users/qiguan/Documents/develop_files/python_files/SSO1/venv/lib/python3.7/site-packages/django/conf/__init__.py", line 82in __getattr__
    self._setup(name)
  File "/Users/qiguan/Documents/develop_files/python_files/SSO1/venv/lib/python3.7/site-packages/django/conf/__init__.py", line 69in _setup
    self._wrapped = Settings(settings_module)
  File "/Users/qiguan/Documents/develop_files/python_files/SSO1/venv/lib/python3.7/site-packages/django/conf/__init__.py", line 170in __init__
    mod = importlib.import_module(self.SETTINGS_MODULE)
  File "/Library/Frameworks/Python.framework/Versions/3.7/lib/python3.7/importlib/__init__.py", line 127in import_module
    return _bootstrap._gcd_import(name[level:], packagelevel)
  File "<frozen importlib._bootstrap>", line 1006in _gcd_import
  File "<frozen importlib._bootstrap>", line 983in _find_and_load
  File "<frozen importlib._bootstrap>", line 967in _find_and_load_unlocked
  File "<frozen importlib._bootstrap>", line 677in _load_unlocked
  File "<frozen importlib._bootstrap_external>", line 728in exec_module
  File "<frozen importlib._bootstrap>", line 219in _call_with_frames_removed
  File "/Users/qiguan/Documents/develop_files/python_files/SSO1/SSO1/settings.py", line 57in <module>
    'DIRS': [os.path.join(BASE_DIR, 'templates')]
NameError: name 'os' is not defined
如果有这个报错的话,在setting.py中导入os即可:import os
然后我们在两个项目的view.py中写入登录和注销函数:
from django.http import HttpResponse
from django.shortcuts import render, redirect


def login(request):
    if request.method == 'GET':
        if 'usr' in request.session:
            # 如果session中已有信息,则显示
            usr = request.session['usr']
            password = request.session['password']
            return HttpResponse("usr:{},password:{},sessionid:{},cookie:{}".format(usr,password,request.session.session_key,request.COOKIES))
        return render(request,'login.html')
    if request.method == 'POST':
        usr = request.POST['usr']
        password = request.POST['password']
        request.session['usr'] = usr
        request.session['password'] = password
        return HttpResponse(
            "usr:{},password:{},sessionid:{},cookie:{}".format(usr, password, request.session.session_key,
                                                               request.COOKIES))


def logout(request):
    request.session.clear()
    return redirect('/login')

url.py中添加路由信息:

"""SSO1 URL Configuration

The `urlpatterns` list routes URLs to views. For more information please see:
    https://docs.djangoproject.com/en/3.1/topics/http/urls/
Examples:
Function views
    1. Add an import:  from my_app import views
    2. Add a URL to urlpatterns:  path('', views.home, name='home')
Class-based views
    1. Add an import:  from other_app.views import Home
    2. Add a URL to urlpatterns:  path('', Home.as_view(), name='home')
Including another URLconf
    1. Import the include() function: from django.urls import include, path
    2. Add a URL to urlpatterns:  path('blog/', include('blog.urls'))
"""
from django.contrib import admin
from django.urls import path
from . import view
urlpatterns = [
    path('admin/', admin.site.urls),
    path('login/',view.login),
    path('logout/',view.logout),
]

Django默认配置了csrf,需要将它注释掉,在settings.py文件中搜csrf,然后注释掉。
修改后的settings.py文件为:
"""
Django settings for SSO1 project.

Generated by 'django-admin startproject' using Django 3.1.7.

For more information on this file, see
https://docs.djangoproject.com/en/3.1/topics/settings/

For the full list of settings and their values, see
https://docs.djangoproject.com/en/3.1/ref/settings/
"""

from pathlib import Path
import os

# Build paths inside the project like this: BASE_DIR / 'subdir'.
BASE_DIR = Path(__file__).resolve().parent.parent


# Quick-start development settings - unsuitable for production
# See https://docs.djangoproject.com/en/3.1/howto/deployment/checklist/

# SECURITY WARNING: keep the secret key used in production secret!
SECRET_KEY = 'o=blc^vzeb1&g*b!si(wtxe44_=i5cv(3jqm2*u2u&7vgj%&=%'

# SECURITY WARNING: don't run with debug turned on in production!
DEBUG = True

ALLOWED_HOSTS = []


# Application definition

INSTALLED_APPS = [
    'django.contrib.admin',
    'django.contrib.auth',
    'django.contrib.contenttypes',
    'django.contrib.sessions',
    'django.contrib.messages',
    'django.contrib.staticfiles',
]

MIDDLEWARE = [
    'django.middleware.security.SecurityMiddleware',
    'django.contrib.sessions.middleware.SessionMiddleware',
    'django.middleware.common.CommonMiddleware',
    # 'django.middleware.csrf.CsrfViewMiddleware',
    'django.contrib.auth.middleware.AuthenticationMiddleware',
    'django.contrib.messages.middleware.MessageMiddleware',
    'django.middleware.clickjacking.XFrameOptionsMiddleware',
]

ROOT_URLCONF = 'SSO1.urls'

TEMPLATES = [
    {
        'BACKEND''django.template.backends.django.DjangoTemplates',
        'DIRS': [os.path.join(BASE_DIR, 'templates')]
        ,
        'APP_DIRS'True,
        'OPTIONS': {
            'context_processors': [
                'django.template.context_processors.debug',
                'django.template.context_processors.request',
                'django.contrib.auth.context_processors.auth',
                'django.contrib.messages.context_processors.messages',
            ],
        },
    },
]

WSGI_APPLICATION = 'SSO1.wsgi.application'


# Database
# https://docs.djangoproject.com/en/3.1/ref/settings/#databases

DATABASES = {
    'default': {
        'ENGINE''django.db.backends.sqlite3',
        'NAME': BASE_DIR / 'db.sqlite3',
    }
}


# Password validation
# https://docs.djangoproject.com/en/3.1/ref/settings/#auth-password-validators

AUTH_PASSWORD_VALIDATORS = [
    {
        'NAME''django.contrib.auth.password_validation.UserAttributeSimilarityValidator',
    },
    {
        'NAME''django.contrib.auth.password_validation.MinimumLengthValidator',
    },
    {
        'NAME''django.contrib.auth.password_validation.CommonPasswordValidator',
    },
    {
        'NAME''django.contrib.auth.password_validation.NumericPasswordValidator',
    },
]


# Internationalization
# https://docs.djangoproject.com/en/3.1/topics/i18n/

LANGUAGE_CODE = 'en-us'

TIME_ZONE = 'UTC'

USE_I18N = True

USE_L10N = True

USE_TZ = True


# Static files (CSS, JavaScript, Images)
# https://docs.djangoproject.com/en/3.1/howto/static-files/

STATIC_URL = '/static/'

然后分别为两个项目做数据库迁移,创建一些Django项目的基础库:python3 manage.py migrate
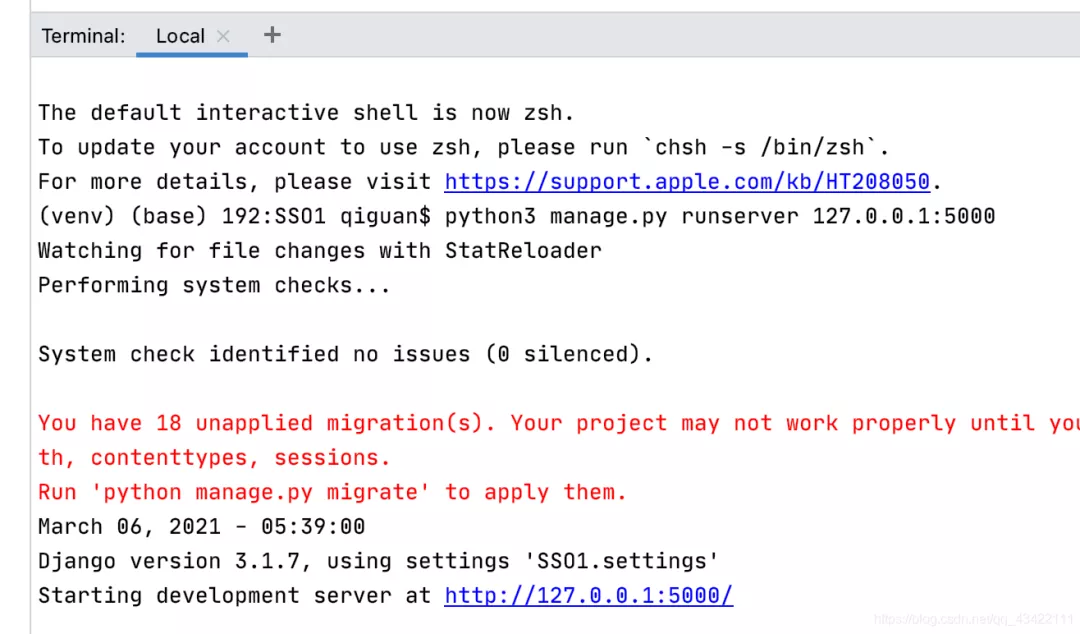
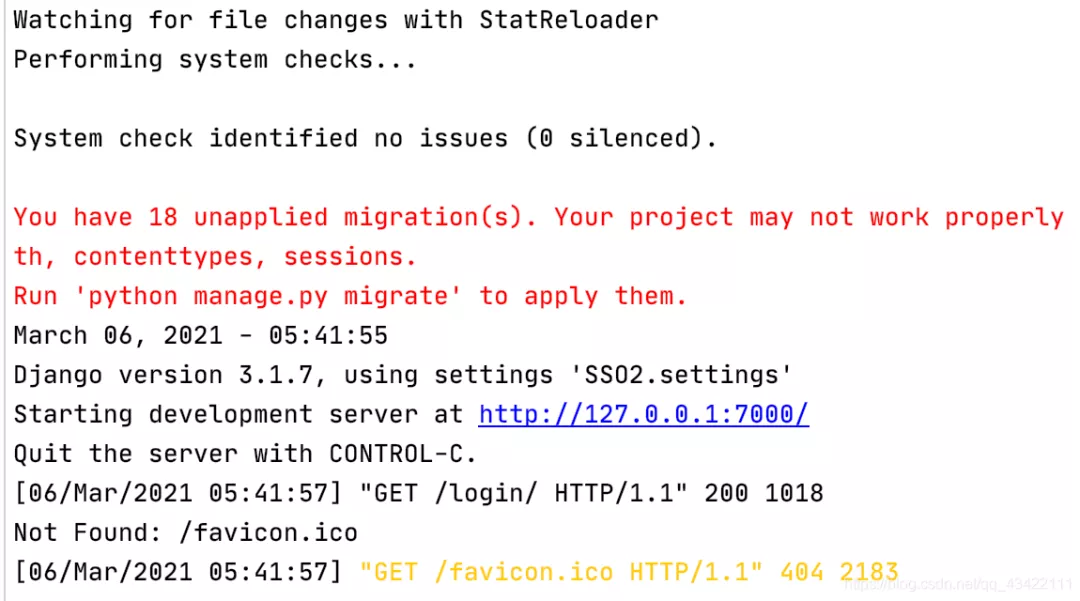
两个项目都是同样的配置,这样我们目前两个测试的项目就搭建好了,然后我们分别启动他们在不同的端口。这里我们就直接手动启动了,分别启动在5000和6000端口。
python3 manage.py runserver 127.0.0.1:5000
python3 manage.py runserver 127.0.0.1:7000
启动两个项目:
Django 实现单点登录(SSO)
Django 实现单点登录(SSO)
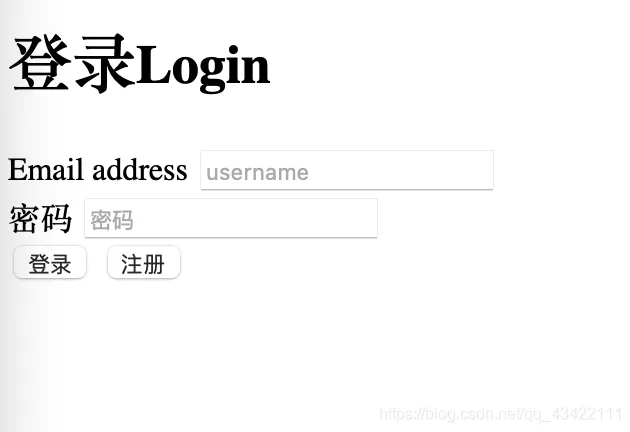
现在我们分别在浏览器中打开http://127.0.0.1:5000/login/http://127.0.0.1:7000/login/,显示的页面都是登录页面,显示如下:
Django 实现单点登录(SSO)
这时我们在http://127.0.0.1:5000/login/随意输入账户密码点击登录,显示:
usr:123,password:123,sessionid:None,cookie:{'csrftoken''8YPzJbY03sHJUZH6kdFZzr9TkDtdVTKflgDDeIn0wgGC6cAeudcrkXLyIxXBEnzG'}
此时我们进入http://127.0.0.1:7000/login/,发现这个应用中,显示的还是之前的页面,登录没有同步。下面我们来实现我们的SSO,这里的实现方法非常的简单,这里提供2中实现方法:
  • 将session固定存储在同一个文件中,
  • 将session存储在Redis中

将session存储在同一个文件中实现SSO

我们在SSO2文件下创建了一个session文件夹,这个文件夹位置任意,写绝对路径即可。
然后我们在两个项目的settings.py中对cookie和session进行配置
# 设置cookie的domain为父域domain,
# 如果是使用域名,以百度为例,主域名为`www.baidu.com`,旗下各个应用为:'asd.baidu.com'
# 则这里设置为:`.baidu.com`
SESSION_COOKIE_DOMAIN = '127.0.0.1'

# 设置session存储在文件中
SESSION_ENGINE = 'django.contrib.sessions.backends.file'
# 设置存储位置,这里设为绝对路径
SESSION_FILE_PATH = '/Users/qiguan/Documents/develop_files/python_files/SSO2/session'

注意一下,这里配置的都是一样的,但是如果两个项目名称不一样的话,是不能直接将完整的settings.py直接复制到另一个的,因为里面有一些项目的配置,例如ROOT_URLCONF = 'SSO1.urls'WSGI_APPLICATION = 'SSO1.wsgi.application'这些前面的都是项目名,需要主要区分。
此时我们在打开
http://127.0.0.1:5000/login/,输入账号密码,此页面显示:
usr:123,password:123,sessionid:2bs2nx2iq879epxu7au7o1zq63o095v7,cookie:{'sessionid''2bs2nx2iq879epxu7au7o1zq63o095v7''csrftoken''8YPzJbY03sHJUZH6kdFZzr9TkDtdVTKflgDDeIn0wgGC6cAeudcrkXLyIxXBEnzG'}
此时我们在打开http://127.0.0.1:7000/login/,我们直接访问,而不用登录,发现显示同样的内容,即我们使用的是同样的内容,实现了SSO。

使用Redis实现SSO

使用文件系统上实现共享session在小并发系统上不会出现问题,但是并发量大的话,会出现一些问题,所以我们这里再介绍一下使用Redis的实现。
需要自行安装Redis,并且在两个项目使用的Python中安装Django-redis:
pip3 install django-redis
在做好这些之后,修改settings.py文件,将使用文件存储session的配置注释掉,修改为:

# # 设置session存储在文件中
# SESSION_ENGINE = 'django.contrib.sessions.backends.file'
# # 设置存储位置,这里设为绝对路径
# SESSION_FILE_PATH = '/Users/qiguan/Documents/develop_files/python_files/SSO2/session'

# 使用Redis存储session
CACHES = {
    "default": {
        "BACKEND""django_redis.cache.RedisCache",
        "LOCATION""redis://127.0.0.1:6379",
        "OPTIONS": {
            "CLIENT_CLASS""django_redis.client.DefaultClient",
            "CONNECTION_POOL_KWARGS": {"max_connections": 100}
            # "PASSWORD": "123",
        }
    }
}

SESSION_ENGINE = 'django.contrib.sessions.backends.cache'
SESSION_CACHE_ALIAS = 'default'
SESSION_COOKIE_AGE = 60 * 5

此时我们再来测试一下两个应用,这时我们先访问一下logout,将session清空,然后访问:http://127.0.0.1:5000/login/,输入账户密码后显示:
usr:123,password:123,sessionid:None,cookie:{'csrftoken''8YPzJbY03sHJUZH6kdFZzr9TkDtdVTKflgDDeIn0wgGC6cAeudcrkXLyIxXBEnzG'}

此时我们访问http://127.0.0.1:7000/login/(不登录),显示同样的usr和password信息。

此时我们的SSO也可以正常实现。

好了,本文就先到这里,大家如有需要,可以根据具体的业务进行实现,这里就不赘述了。等以后有空再写一些Django相关的开发博客。

windows 服务器下的 apache 出现 MemoryError (django wsgi )

用django开发的一个老项目,开发时版本是0.9 , 后期服务器迁移多次,现在django版本用的1.2,用的apache 配合 wsgi模块搭建,原来服务器是linux,目前移到了 windows server 2012 配置是 2 cpu, 8g mem

昨天客户说服务器出问题了,访问时出现 500错误,internal server error

登录到服务器,打开apache的日志,发现和以前的不一样,并没有指出程序什么地方出错,截取一段如下

[Fri Sep 22 09:38:02 2029] [error] [client xxx.xxx.xxx.xxx]     args[0] = force_unicode(args[0]), referer: http://xx.xxx.xx.xx/xxxx/xxxx/index/
[Fri Sep 22 09:38:02 2029] [error] [client xxx.xxx.xxx.xxx]   File "D:\\Python27\\lib\\site-packages\\django\\utils\\encoding.py", line 85, in force_unicode, referer: http://xx.xxx.xx.xx/xxxx/index/
[Fri Sep 22 09:38:02 2029] [error] [client xxx.xxx.xxx.xxx]     s = s.decode(encoding, errors), referer: http://xx.xxx.xx.xx/xxxx/xxxx/index/
[Fri Sep 22 09:38:02 2029] [error] [client xxx.xxx.xxx.xxx]   File "D:\\Python27\\Lib\\encodings\\utf_8.py", line 16, in decode, referer: http://xx.xxx.xx.xx/xxxx/xxxx/index/
[Fri Sep 22 09:38:02 2029] [error] [client xxx.xxx.xxx.xxx]     return codecs.utf_8_decode(input, errors, True), referer: http://xx.xxx.xx.xx/xxxx/xxxx/index/
[Fri Sep 22 09:38:02 2029] [error] [client xxx.xxx.xxx.xxx] TemplateSyntaxError: Caught MemoryError while rendering: , referer: http://xx.xxx.xx.xx/xxxx/xxxx/index/
[Fri Sep 22 09:38:04 2029] [error] [client xxx.xxx.xxx.xxx] mod_wsgi (pid=4308): Exception occurred processing WSGI script 'D:/mytest/wsgi/mytest.wsgi'., referer: http://xx.xxx.xx.xx/xxxx/xxxx/index/
[Fri Sep 22 09:38:04 2029] [error] [client xxx.xxx.xxx.xxx] Traceback (most recent call last):, referer: http://xx.xxx.xx.xx/xxxx/xxxx/index/
[Fri Sep 22 09:38:04 2029] [error] [client xxx.xxx.xxx.xxx]   File "D:\\Python27\\lib\\site-packages\\django\\http\\__init__.py", line 431, in next, referer: http://xx.xxx.xx.xx/xxxx/xxxx/index/
[Fri Sep 22 09:38:04 2029] [error] [client xxx.xxx.xxx.xxx]     chunk = chunk.encode(self._charset), referer: http://xx.xxx.xx.xx/xxxx/xxxx/index/
[Fri Sep 22 09:38:04 2029] [error] [client xxx.xxx.xxx.xxx]   File "D:\\Python27\\lib\\site-packages\\django\\utils\\functional.py", line 55, in _curried, referer: http://xx.xxx.xx.xx/xxxx/xxxx/index/
[Fri Sep 22 09:38:04 2029] [error] [client xxx.xxx.xxx.xxx]     return _curried_func(*(args+moreargs), **dict(kwargs, **morekwargs)), referer: http://xx.xxx.xx.xx/xxxx/xxxx/index/
[Fri Sep 22 09:38:04 2029] [error] [client xxx.xxx.xxx.xxx]   File "D:\\Python27\\lib\\site-packages\\django\\utils\\safestring.py", line 81, in _proxy_method, referer: http://xx.xxx.xx.xx/xxxx/xxxx/index/
[Fri Sep 22 09:38:04 2029] [error] [client xxx.xxx.xxx.xxx]     data = method(self, *args, **kwargs), referer: http://xx.xxx.xx.xx/xxxx/xxxx/index/
[Fri Sep 22 09:38:04 2029] [error] [client xxx.xxx.xxx.xxx] MemoryError, referer: http://xx.xxx.xx.xx/xxxx/xxxx/index/

MemoryError ? 这是说内存错误?

查看任务管理器后发现内存使用近4G, 离8G的内存还远着,再看apache使用了近2G, 尝试将 apache 服务重新启动了一下,发现apache内存使用将到了 25M。而原来出现错误的页面都已经正常。

联想到新增加了视频上传功能,猜测可能是用户最近上传视频之后,导致了apache的内存泄漏。

联想到前段时间一台云服务器1cpu, 1g mem 出现的内存不足问题,先对apache进行配置调节。

五.启用MPM模块配置文件
1.MPM模块是专门针对Windows操作系统而优化设计的,在Apace安装目录下的conf下的httpd.conf文件中启用该配置文件
找到
# Server-pool management (MPM specific)

Include conf/extra/httpd-mpm.conf (去掉前面的注释符号"#")
2.在Apace安装目录下的conf下extra目录中的配置文件httpd-mpm.conf中更改MPM模块的相关配置
找到mpm_winnt_module,由于mpm_winnt模块只会创建1个子进程,因此这里对单个子进程的参数设置就相当于对整个Apache的参数设置。
<IfModule mpm_winnt_module>

ThreadsPerChild 1500

MaxRequestsPerChild 0

</IfModule>
ThreadsPerChild: 线程数量,线程数量越大,越能够更好的处理更多并发连接。默认值是150,推荐设置:小型网站=1000 中型网站=1000~2000 大型网站=2000~3500
MaxConnectionsPerChild:累计最多处理到多少个请求,超过该值会自动重启Apache,设置为0,则没有限制,但可能会照成内存泄漏。小型网站=10000 中型或大型网站=20000~100000,若设置为大于0时,最好为ThreadsPerChild的100倍

MaxConnectionsPerChild:累计最多处理到多少个请求,超过该值会自动重启Apache,设置为0,则没有限制,但可能会照成内存泄漏。小型网站=10000 中型或大型网站=20000~100000,若设置为大于0时,最好为ThreadsPerChild的100倍

考虑到内部系统,将参数调小一点,观察一下将来是否正常。
#ThreadsPerChild 150
#MaxRequestsPerChild 0

ThreadsPerChild 100
MaxRequestsPerChild 5000

参考: https://blog.csdn.net/xyy1028/article/details/89440858